If you’ve landed on this page you are eager to save money on your backyard maple syrup operation.

–For an updated version of this article, please go here.–
I’m Michelle, author of Sweet Maple, Backyard Sugarmaking from Tap to Table (in bookstores nationwide Fall 2019–-go here for more info), and I’m so glad you found this page. If you’re a sugarmaker looking to save money, this right here will make your day.
But first, I applaud you. Seriously. I have huge respect for DIYers like you who know what they want and can seriously build it.
I’m not like you. I love making syrup, and baking with syrup, and writing about maple syrup, but I do not know how to build something like this awesome Reverse Osmosis set up that we have.
Nope, that’s all my husband’s ingenuity. And I have huge respect for Bill and for YOU, since you’re here.
Me? I wouldn’t know how to even cut the plywood the size I wanted it.
So I asked Bill to walk me through exactly what he did to make this sweet contraption. Since it saves us hundreds of dollars every year in fuel costs as we boil our sap, I totally wanna tell y’all exactly how to build your own. But first, if you stumbled here wondering what an “ro system” is, I’ll explain…
What is a reverse osmosis system?
A reverse osmosis system is exactly like a water filtering system, ya know, that filters out the impurities and leaves you with wonderfully pure drinking water? (In fact, you’ll see below that’s exactly what we’re using–filters from a water purifying system.)
Except sugarmakers use the idea in reverse. We filter out the “impurities” (aka the sugars in the sap) and keep them. That’s what we boil down to make syrup. But after the sap has run through the ro system, we can spend a lot less time, energy, and fuel to boil it. And we’re left with pure, cool permeate… but we’ll talk more about that in another post, later this season.
Why don’t we use wood for fuel?
Our family does live on 14 wooded acres, and we do cut and store wood. But we also heat our 200-year-old farmhouse (aka very drafty farmhouse) with a wood stove. All winter. All very-long-cold-New-England winter. There just aren’t enough hours in the day or trees in the woods to do it all. So we choose to boil our sap with propane. Even so, plenty of backyard sugarmakers who burn wood for fuel use an ro as well. (Read about Ray Ingham’s ro experiences below.) Even though wood may be more economical than propane, we all wanna save on fuel, no matter where were get it, can I get an “amen”?
Of course, no matter what you use for fuel, cuddling with a barn cat while you watch the sap boil makes everything a little more puuurfect. (Sorry, bad pun.)

If you wanna read more about why we ro, go here. Wanna know how we even do some natural ro for FREE? Read this article right here. Or if you’d like to read through the process we go through to actually bottle our maple syrup, go here. Otherwise, read on…
So how hard is this to put together?
Here’s our Reverse Osmosis set up. It’s rather simple, it’s rather small, but it’s totally huge on savings.
How long does it take to put it all together? Honestly, getting all the pieces is the largest drain on your time. Once you have all the parts in front of you? A few hours, tops.
How long does it take for a 5-gallon bucket of sap to go through the system? We use filters intended for 150 gallons per day, and 5 gallons goes through in about 45 minutes.

Disclaimer: This post contains affiliate links.
To build a reverse osmosis set up of your own–and seriously slash your propane expenses–you’ll need a piece of plywood, or something similar, for mounting everything, and you’ll need the following items, which are all pictured below as well, in the order they’re listed. Click either the item name or the picture for ordering information.
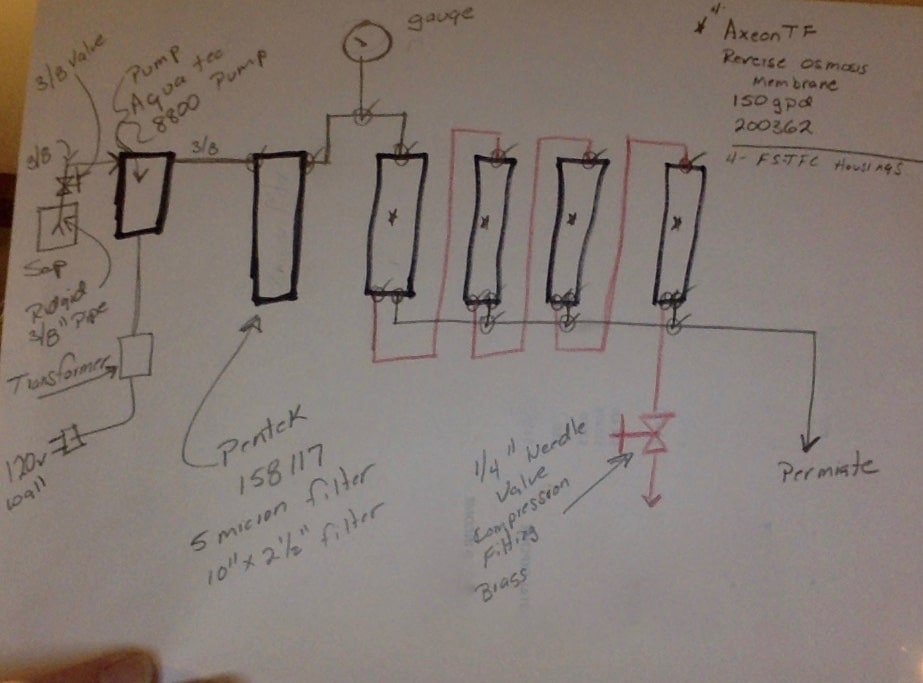
Then keep scrolling for a totally unprofessional, hope-you-understand-what-he’s-talking-about drawing of Bill’s design.
These items we ordered on Amazon.
Pump and transformer, membranes* (you will need 4 but see other links for varying gallons per day), membrane casings (4), filter 4-pack, filter housing, pressure gauge, a straight needle valve.

 |
| 
 (4)* |
 (4) |
(4) | 
 |
|
|
* For your membrane, you can choose the one linked above, for 50 gallons per day, or upgrade to one for 100 gpd or 150 gpd. (We use the 150 gpd filters. We have 110 taps and process roughly 5 gallons of sap through the RO every 45 minutes.)
btw, if you don’t already have Amazon Prime, I highly recommend it. We live in nowhere-ville, so traveling to Lowes is quite a trek. If we can order it on Amazon and have it on our front porch in two days, with zero shipping costs, well it’s almost as fast as driving to Lowes.
But seriously, you can try out Prime for totally free for 30 days. If nothing else, sign up and get all these goodies delivered to your door for free shipping, right away, so you can start saving money on your propane.
Try Amazon Prime 30-Day Free Trial by clicking through this link.
You’ll also need some tubing and connectors, as well as another valve. These items, which I couldn’t find on Amazon, I list below, along with where I did find them and the item #s or purchasing info you’ll need.
These items we picked up at Lowes.
1/4″ T (you’ll need 4 of them) Sharkbite item # 835039, model #25427Z
1/4″ male x 1/4″ quick connect 90° (you’ll need 5 of them) Sharkbite item #83500, model #25433
1/4″ male x 1/4″ quick connect straight (you’ll need 8 of these) Sharkbite item #835025, model #25413Z
3/8″ x 1/4″ male quick connect (just 1) Sharkbite item #835028, model #25416Z
3/8 polyethylene tubing (25′ of it) item #879277, model #98634
1/4 polyethylene tubing (25′ of it) item #814305, model #98584
3/8″ quick connect ball valve (just 1) Sharkbite item #835049, model #25438Z
ridgid 3/8″ x 30″ pex tube (30″ faucet) item #751655, model #7227-30-38-2
Here’s the artwork I promised you.

What do other folks think about this crazy contraption?
Ray Ingham is a hobby sugarmaker in Huntington, Vermont. Ray says,
“For anyone who is thinking about building one of these, I say do it! I put one together last year using 4 100 gpd membranes. It cost me about $350 and was well worth it. I’m retired and a one-man band. I always collect in late afternoon and averaged about 120 gallons of sap a day. I would run the RO over night and extract about 7 gals. of pure water an hour. By morning I would have 30 – 40 gallons of sap to boil down. My sap went from 1.5% sugar to 4 to 5% sugar after running through my ro. I would boil this down in less than 3 hours in my 2×4 pan. I saved a incredible amount of time and firewood.”
Heather Gilson, whose family has about 50 taps in their backyard on any given year, explains,
“My husband built one last year and man was it a time saver for us!! We saved so much time in not splitting a bunch of extra wood, not having to boil for extended periods of time. It was amazing!”
Colleen Falardeau, a backyard sugarmaker who built her own RO, says,
“It cost us roughly $300 to make our RO and it takes sap from 2-3% sugar content to 7-8% in one pass! We have 100 taps and the wood saved and time saved in one season has made it worth every penny!!“
Here are some other links that might interest you
Or just follow my Maple Syrup pinterest board right here. Everything I ever write about maple gets added to that one board.


